Setting up a Local Linux Server with MySQL Support
The following will cover briefly one approach to setting up a local server on a Ubuntu(Linux) 12.04 LTS machine with MySQL support. The server software installed is Apache 2.2.22. The MySQL version installed 5.7.11. The package PHP 5.3.10 which is required for the server to communicate with MySQL is also installed.
The following buttons appear beneath each short section and open up additional information.
 Describes bugs, difficulties, or other anomalies that might be encountered.
 Contains additional comments regarding the commands executed.
 Contains links to web resources that either were the original source of the command sequence executed or contain additional information on the commands.
At the end of the sequence described on this site the server will function as a local host which supports MySQL. Such a system can be used for testing code that will uploaded to another server, and for educational purposes. The web site hosted on the server system can also be made available to other computers across a LAN; this is discussed in the final section. Programming a webpage to access the database is covered by: "Programming a Webpage with MySQL DataBase Access for Localhost".
Disclaimer: The following sequence of commands was taken from notes after the fact. It should work in principle; however, it could contain omisions.
1.1 Installing
Remove any MySQL packages that have already been installed:
Download the MySQL package from oracle at Oracle MySQL Downloads. Specifically download the package: mysql-5.7.11-linux-glibc2.5-x86_64.tar.gz and check the md5 signature. Run: md5sum mysql-5.7.11-linux-glibc2.5-x86_64.tar.gz and check that the output matches the signature given on the website for this file.
1.1.B1Err http://security.ubuntu.com/ubuntu/ precise-security/main mysql-client-core-5.5 amd64 5.5.46-0ubuntu0.12.04.2 404 Not Found [IP: 91.189.91.14 80]
Failed to fetch http://security.ubuntu.com/ubuntu/pool/main/m/mysql-5.5/mysql-client-core-5.5_5.5.46-0ubuntu0.12.04.2_amd64.deb 404 Not Found [IP: 91.189.91.14 80]
E: Unable to fetch some archives, maybe run apt-get update or try with –fix-missing?
Unpack the MySQL distribution.
$ tar -xvf mysql-5.7.11-linux-glibc2.5-x86_64.tar
The result of the last tar -xvf command is a file with the name mysql-5.7.11-linux-glibc2.5-x86_64.tar.gz.
1.1.B2mysql-5.7.11-linux-glibc2.5-x86_64.tar.gz when extracted reveals a second mysql-5.7.11-linux-glibc2.5-x86_64.tar.gz file with the same name as the original. Unpacking the second file results in the MySQL package directory.Log on with root privileges and omit the sudo command in all of the following instructions.
Or, if it is not possible or not desirable to log on as root then use the command sudo in front of all command sequences that require root user privileges.
Create a directory in which to unpack the files:
Move the extracted .tar.gz file into this directory and unpack:
$ sudo gunzip mysql-5.7.11-linux-glibc2.5-x86_64.tar.gz
$ sudo tar -xvf mysql-5.7.11-linux-glibc2.5-x86_64.tar
Move and rename the extracted directory, mysql-5.7.11-linux-glibc2.5-x86_64:
This results in a directory named /usr/local/mysql with the MySQL package files in it. Remove(optional) the /usr/local/tmp directory and its contents.
Check if the library libaio is installed:
This command should return something like:
If this library is not installed then install it from the Ubuntu Software Center where it is listed under the name libaio1. The libaio version installed is libaio1 0.3.109-2ubuntu1.
1.1.C1libaio1, can be installed using the command:
Create a new group account called mysqlgroup:
Create a system user account named mysqluser in the group mysqlgroup without shell login capacity:
1.1.C2sudo useradd -r -g mysqlgroup -s /bin/false mysqluser, that creates the new user account, mysqluser there are a number of options.
- The
-roption specifies that account will be a system user account. - The
-g mysqlgroupoption creates the new user account in the group:mysqlgroup. - The option
-sspecifies the login shell for the new user. In this case the login shell is set to/bin/false. This means that the new user will not be able to log in from a shell. - The name of the new user account,
mysqluser, is expected at the end of theuseraddcommand.
Make the directory mysql-files in the /usr/local/mysql directory and change its permissions:
$ sudo chmod 750 mysql-files
1.1.C3chmod 750 mysql-files changes the permissions of the directory, mysql-files, to be owner readable, writable, and executable; group readable and executable, but not writable; and untouchable (readable, writable, or executable) to all other users. The permissions for a directory or file can be viewed by executing the command ls -l. The -R option for the command # chown -R the_directory specifies that everything in the directory will change ownership and not just the directory itself.Change the owner of everything in the directory /usr/local/mysql to mysqluser:
$ sudo chown -R mysqluser .
Also change the group of the directory contents to mysqlgroup:
Now initialize MySQL:
This command generates a series of warning messages, these do not seem to be a problem however. Write down or otherwise save the random password generated during the initialization. Record the password in the line:
The =Ux? symbols are part of the password.
Generate the RSA key:
Change the permissions of the files in the /usr/local/mysql directory again:
$ sudo chown -R root .
$ sudo chown -R mysqluser data mysql-files
1.1.B3$ sudo bin/mysql –initialize –user=mysqluser returns the error message:
libaio has not been installed. It can be found in the Ubuntu Software Center under libaio1 and installed; see the instructions in section ?.1.1.B4$ sudo bin/mysqld --initialize --user=mysqluser fails with the following error message:
mysql-5.7.11-linux-glibc2.5-x86_64, has been renamed to mysql and moved into /usr/local; see section ?.1.1.L- The downloads for MySQL are available from: MySQL Dev Downloads
- The installation instructions for MySQL are covered by: MySQL Dev Installation Instructions
- Explanation of what the
chmodcommand does: meinit.nl Linux Permissions Explained
1.2 Post Install Config
Setup the config file. Edit my.cnf which is typically located in the directory: /etc/mysql. Under [mysqld] reset the user, basedir, datadir, and lc-messages-dir as follows:
basedir = /usr/local/mysql
datadir = /usr/local/mysql/data
lc-messages-dir = /usr/local/mysql/share/english
Comment out the following lines which may cause error messages (if they are not already commented):
#myisam-recover = BACKUP
#max_connections = 100
#table_cache = 64
#thread_concurrency = 10
In the /etc/mysql/my.cnf file note the location of the error log files for future reference. The error log file is set by the log_error variable in this file:
The other error-messages will be located in a .err file which is in the directory set by the datadir variable.
If the directory /var/log/mysql does not already exist, then create it and set its owner and group to mysqluser and mysqlgroup respectively.
1.1.A41.3 Testing
Start MySQL:
$ sudo ./bin/mysqld_safe --user=mysqluser
1.3.C1mysqld_safe, is the recommended way to start MySQL; it adds some safety features. See: MySQL Dev mysqld-safe Doc1.3.C2& char can be added to the start command for MySQL in order to make MySQL run in the background:
1.3.B1Permission denied error messages are generated. To correct, run the command with sudo.Verify that MySQL is running:
This should return more than one line with the command: ./bin/mysqld_safe in it.
Now that MySQL is running open another terminal and change the root password:
$ ./bin/mysql -u root -p
Enter the auto password that was generated by bin/mysqld –initialize... as the current root password. The MySQL monitor will open up with a welcome message.
1.3.B2mysqladmin -u root -p command sequence to function. The root password is by default set to an auto-generated password when MySQL is initialized. This auto-generated password may contain char's such as the equal sign '=' at the beginning of the password.1.3.B3./bin/mysql when MySQL is NOT running. To fix start MySQL, as root:
# ./bin/mysqld_safe -user=mysqluser
# ./bin/mysql -u root -p
sudo:
$ sudo ./bin/mysqld_safe -user=mysqluser
$ sudo ./bin/mysql -u root -p
./bin/mysql command sequence again.In the monitor change the root password from the auto-genrated password to a new one:
Exit the monitor: \q
The next time the, $ ./bin/mysql -u root -p, command is run, enter the new root password.
Shut MySQL down:
$ ./bin/mysqladmin -u root -p shutdown
Enter the mysql root password when prompted.
Verify that MySQL has shut down:
The lines with the command: ./bin/mysqld_safe, should be gone.
1.3.B4/var/log/mysql/error.log, is a useful reference for debugging MySQL startup issues.1.3.B5user variable in the /etc/mysql/my.cnf file will lead to MySQL failing to run when the command: ./bin/mysqld_safe –user=mysqluser is executed. Check the error log file to identify such errors.1.3.B6cannot access, cannot touch; and Directory nonexistent or No such file or directory are typical if the log_error variable in my.cnf is set to a directory that does not exist, or that mysqluser does not have permission to access.1.3.B7Directory nonexistent error-messages are also generated if the basedir and datadir variables are incorrectly set in the /etc/mysql/my.cnf file.1.3.B8lc-messages-dir variable in my.cnf is incorrectly set.1.3.B9myisam-recover = BACKUP, in my.cnf is not commented out.1.3.B6mysqld_safe exits right after it starts. The command: # ./bin/mysqld_safe --user=mysqluser dumps:
2016-05-23T23:08:40.781114Z mysqld_safe Starting mysqld daemon with databases from /usr/local/mysql/data
2016-05-23T23:08:43.260148Z mysqld_safe mysqld from pid file /var/run/mysqld/mysqld.pid ended
/var/log/mysql/error.log contains the line:
/var/run/mysqld/' are blocking mysqld_safe from writing to this directory, and therfore blocking MySQL from starting. To fix, reset the permissions of the /var/run/mysqld directory:
# chown mysqluser mysqld/
# chgrp mysqlgroup mysqld/
1.3.L- Discussion of
mysqld_safe: MySQL Docs mysql_safe - Discussion of the
my.cnffile: MySQL Docs Option-files - Alternate methods to change the conf options (instead of editing the
my.cnffile directly): MySQL Docs Data Directory Initization
Installing
First check if apache2 is already installed:
If apache2 is installed it this command will return:
Installed: 2.2.22-1ubuntu1.10
Candidate: 2.2.22-1ubuntu1.10
Version table: ...
Otherwise it should return:
Installed: (none)
…
If apache2 is not installed install it using the command:
Testing
After Apache is installed check that it runs:
$ ps aux | grep apache
2.2.B1apachectl start without the sudo command it will not start unless the user is logged in as root.2.2.B2The result of the ps aux command should show instances of: /usr/sbin/apache2 in the COMMAND column. Next open a web browser and navigate to http://localhost/ This should display an introductory page. By default the html code for this page is in index.html and located in the /var/www/ directory.
2.2.B2ps command list the processes that are running on the computer. The aux modifier shows processes for all users by effective user ID, including processes not attached to the current terminal. Use the command # ps –help for further information.2.2.B2grep command searches its input for a specific phrase, in this case “apache”; and dumps all lines in which that phrase occurs.2.2.B2| is the pipe command which sends the input from the ps command into the grep command. The output of the grep command is then dumped to the terminal.Stop Apache using the command:
Check that Apache is no longer running using the $ ps aux | grep apache command again.
2.2.B2html files saved on it in the browser. Direct the browser to:http://localhost/path_after_var_www/file_name_where_html_code_is_written.htmlwhere
path_after_var_www is the path after the /var/www directory. The rest of the software loaded is necessary to implement the database: MySQL.2.2.B2html. 2.2.B22.2.B2/usr/sbin/apachectl
2.2.B2 apt-get; The system on which this server was tested had Apache installed both using the above method and from source.1.3.L- The website for the Apache server project: apache.org
- A description of what Apache is and does: Apache Getting Started
- Some comments on what the
sbindirectory is and why some programs(such as Apache) store their executables there: linfo.org sbin
Installing
Check if PHP5 with MySQL support is already installed:
If the package php5-mysql is already installed this should return:
Installed: 5.3.10-1ubuntu3.21
Candidate: 5.3.10-1ubuntu3.22
Version table:
...
If php5-mysql is not installed, install PHP5 with MySQL support:
2.3.C1/etc/php5/apache2/. The executable for PHP is /usr/bin/php5, with the command /usr/bin/php pointing to the php5 executable (in a somewhat roundabout fashion). PHP library files are located under: /usr/lib/php5.2.3.C12.3.C1- I originally found the recommendation for installing PHP in this fashion from SejiSensei's response to the thread: "mysqli extension in php5" on ubuntuforums.org
- The PHP Group's home page: php.net
Start Programs
See if apache is already running. Enter http://localhost into the navigation bar of the default web browser. If a web page with a message shows up instead of the "unable to connect" message, the sever is running. If Apache is not running, start it with:
Start MySQL:
$ sudo ./bin/mysqld_safe --user=mysqluser
The Test File
Create a file: test.php in the /var/www/ directory. This will probably require root/superuser permissions. The file should contain the following:
    <!doctype html>
    <html>

        <head>
            <title>PHP test</title>
        </head>
        <body>
            <?php
                echo "<p>MySQLi loaded?</p>";
                $cxn = extension_loaded(MySQLi);
                if( $cxn ){
                    echo "<p>true</p>";
                } else {
                    echo "<p>false</p>";
                }
            ?>
            <?php
                phpinfo();
            ?>
        </body>

    </html>
Test Results
Navigate to the file, test.php in the browser; enter: http://localhost/test.php. The result should answer “true” to the question “MySQLi loaded?”.
The command: phpinfo(), dumps a number of info tables. MySQL should have at least one table with several lines listing its values. The screen output will look something like this:

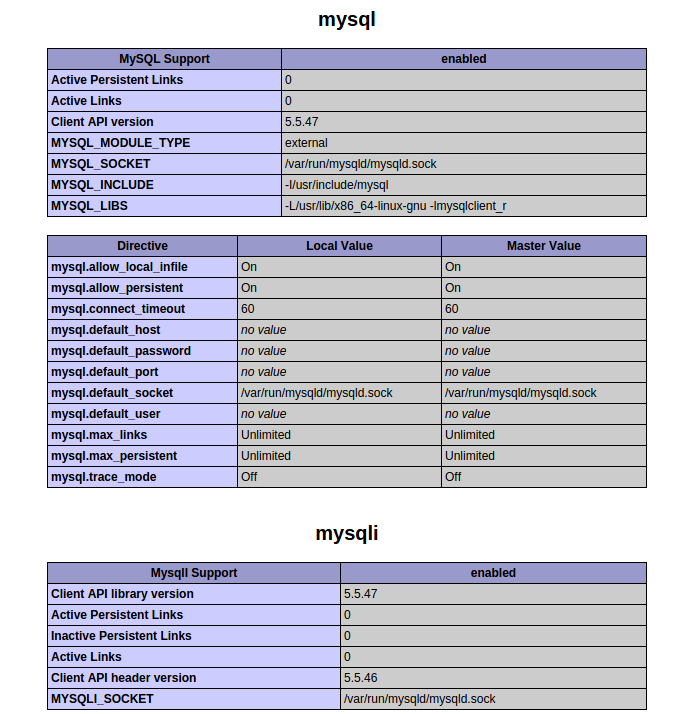
The Local Server is now up and running with MySQL support. See ? For a discussion of creating a web page that accesses a MySQL database.
Configuring Firewall
If the host computer for the local server is connected through a router to a LAN its web pages can be accessed by other computers on the network. First the firewall on the server computer must be reset to allow access to its http port.
1.4.B1# ufw allow http.To reset the firewall on the server host to allow it to connect to other computers using http port:
WARNING: Reseting the firewall may leave the computer hosting the server open to attack. To close the firewall again:
Finding IP Address of Server
After the firewall is open, the web page on the server computer located under /var/www/index.html can be accessed by its LAN IP address as assigned by the router. For instance, if the web server computer is assigned an IP address of: 192.168.1.5 by the router, a second, client, computer can access the server through the web address http://192.168.1.5/ which is entered into the web browser of the client.
The IP address currently assigned to the server by the router can be accessed for Netgear routers in the following fashion, see the netgear.com answer to logging in to home router. Navigate using a web browser such as Chrome to the IP address of the router. The default IP address of the router can be found by doing an Internet search for its model and default IP address. Generally for Netgear routers the default IP address is 192.168.1.1 or 192.168.0.1. For a router using the IP designation of 192.168.1.1, enter http://192.168.1.1 in the browser's address bar. This will lead to a password prompt which if answered correctly (Default:admin, password) opens up a configuration page.
1.4.L1- Finding the address of a Netgear router: kb.netgear.com
- Finding the address of a Linksys router: www.linksys.com
The current IP addresses of devices connected to the router can be found from the menus accessible from the router configuration page. For instance, for my Netgear router the table of device names and IP addresses could be accessed under the Attached Devices label under the Maintenance section located in the menu bar on the right hand side of the configuration entry page. The IP address for my server is listed next to its device name which contains its computer name, as set when Ubuntu was installed.
The IP addresses assigned to the devices by the router are not necessarily constant. To set a static IP address for a device attached to a Netgear router see the documentation on kb.netgear.com
2.3.C1The method discussed in this section allows the server to be accessed by its IP address but not by its, non-numeric, site name. There are in principle two means to setup the server such that it can be accessed from other computers by its site name.
The first method give the server a fixed IP address and then setup the other, client, computers on the network so that they associate this IP address with the servers name. For Linux client computers this can be done by editing the /etc/hosts and /etc/networks file: see oreilly.com.
The second method is to set up a computer on the network to function as a Domain Name Server(DNS) for the local network. This method does not require each of the client computers to be reconfigured use the proper server name. The DNS will translate any local site name entered in a browser of a client computer to the proper IP address on the local network. The same computer that acts as the local server for the web site can be setup to also function as the DNS, or another system can be used. To set up a Linux system as a DNS see:tldp.org DNS-HOWTO; other references can be found in the links section. After the DNS server is setup the router must be configured to use the DNS. For netgear routers this is disucssed here: documentation.netgear.com.
Note: I have not tested the instructions given in the links here to set up a DNS nor to reconfigure the clients' IP name mapping.
2.3.B2- The wrong IP address is used; Check the router for the correct address immediately before accessing the server. Many routers by default use dynamic IP addresses.
- The server software is not up. Check that the web site is available when
http://localhostis typed in the address bar of a browser on the server computer - Auto-complete or auto-search are active for the web browser and re-writing the entered server IP address. Check that the web address in the browser bar is
http://192.168.1.10or192.168.1.10where "192.168.1.10" must be replaced with the real web address of your server. - The firewall was not opened successfully, see bug-comment: 1.3.B1. Check the firewall settings by using the command:
ufw allow httpexactly, not a variant.
1.3.L- Configuring DNS Netgear Router: documentation.netgear.com SSL 312-09-07.html
- Network administration: oreilly.com debian book ch10.01
- Domain Name Server Configuration: tldp.org domain-name-server
- DNS HowTo: tldp.org DNS-HOWTO
- DNS configuration for Ubuntu: help.ubuntu.com dns-configurtaion
- DNS for Ubuntu: ubuntuforums.org tomtom_in_eire